Want to read more about gourd carving?  Click on the title below to see "The Complete Book of Gourd Carving" by Jim Widess and Ginger Summit.  Some of my work is featured in this book.


Another good technique book by Sue Waters:


Many more Carving books can be found on the "Books" page.

Power carving tips
Some ideas for basic carving and inlay.  You can inlay all kinds of items including stones, heishi, dichroic glass, buttons, and beaded items.


This is the easiest and safest way I have found to hold the rotary tool.  Prop gourd firmly in your lap.  Hold your thumb and knuckle of index finger against the gourd to steady your hand.  Grip the rotary tool FIRMLY in your palm and fingers.  Rotate gourd away from you to cut, always keeping your hand and thumb held firmly against the gourd.  Your hand should never be close to your chest.
Step one: Cut the top off and clean the gourd.  Draw all lines to be carved or inlaid.    I use a Dremel or Foredom rotary tool for power carving.  My favorite accessories are a  sanding drum with coarse and fine bands, high speed steel burs including: Inverted cone shape used to carve and lower areas.   Ball shape - size depends on diameter of heishi you are inlaying.   Mini circular saw shape  (5/32" head) for cutting lines.  I have also started using structured tooth carbide burs because they cut fast and smooth.  These can all be seen on my carving burs page (or see link to the left.)
I have a small curved round riffler file I use to smooth the groove I cut for inlay.  You can also use a small round needle file, or a folded or small rolled tube of sandpaper.  (You can see better pictures of the rifflers on the "Tools " page.)
Cutting Step One:  Cut ALL lines with the small saw shaped bur.  This small cutter is easy to control, and will make your later cuts easier.  If you are lowering an area, use the inverted cone shape next.  Cut right along the line you have already made - it will help guide the new cut.  Use the same technique for cutting a groove for heishi with a ball bur.  You will find it to be almost impossible to cut a smooth line with the ball bur if you don't use the saw shaped bur first to establish a guide line!  (Be sure to practice on a not so nice gourd before attempting this on your prizewinner!)
 To inlay a cabochon, trace the stone shape where you want to set it. Cut away the outline with the small saw bur.  Remove the interior area with the ball bur. If needed, fill the area with wood putty and press the stone in to fill gaps and seat the stone evenly.   Above, you can also see where I have carved and lowered the lightning bolt shaped area.  I used the drum sander to help smooth and remove the center area after the edges were cut with the inverted cone shaped bur.  I have also started cutting and lowering some "sand ripples".
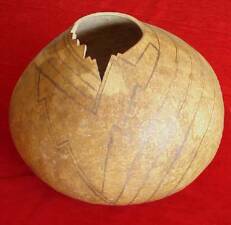
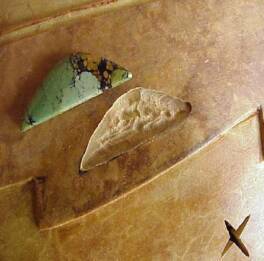
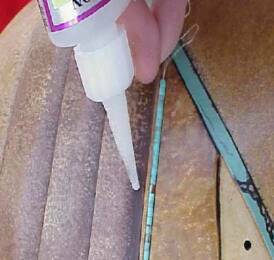
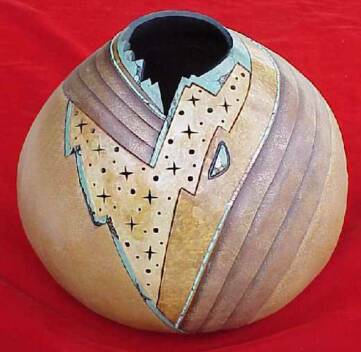
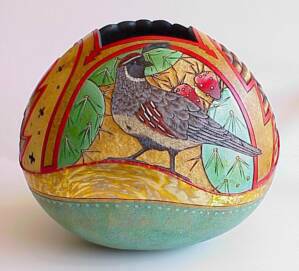
The finished gourd.  The greenish areas have been painted to match the colors in the natural turquoise stone inlaid into the design.  The stars and circles in the natural colored area are cut through the gourd.  Except for the natural finish of the center section, the rest has been painted.  I used a belt sander to flatten the bottom and make the gourd sit nice, so that limits me to painting those areas.
 
 
:
Paint or stain your gourd and apply your sealer or finish before gluing in stones or heishi. Use a good quality gap filling super glue.  Working a few inches at a time, run a small bead of glue into the groove, and then press heishi into the groove.  Make sure the heishi beads fit snug against each other when you press them in.  You can leave them on the string, (trim ends of string off after glue is set) but if they are on wire, it is better to slide them off the wire as you glue.
Image Links:
 Supplies & Resources:
Carving and Inlay Examples:
Here are some finished examples that use some of these carving and inlay techniques.


More Tutorials:
Gourd Carving
Decorating Gourds: Carving, Burning, Painting


email me
Note: If you can't find them locally, heishi and stones are available on the "Inlay Supplies" page. The gap filling glue is located on the "Tools" page.
An important note about your safety:
Carving gourds creates a lot of dust! Protect your lungs and health by using a dust rated respirator at all times. Look for inexpensive but excellent quality  respirators on our Tools page.

If you work in a confined area, consider adding a dust collection system to aid in removing airborne particles.
Carving and Inlay Tutorial © 2004 -Bonnie Gibson
*You may link to this tutorial, however, you must link here rather than put up your own page.